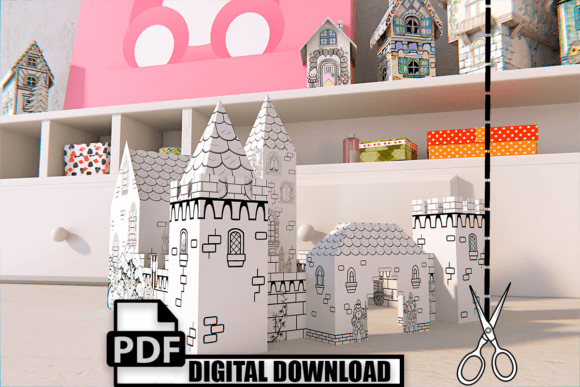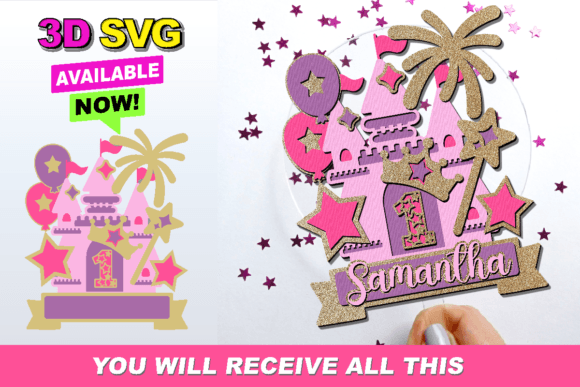
Unlocking Creativity: A Beginner’s Guide to Using the Castle Cake Topper SVG
In the vibrant world of digital crafting, few projects capture the imagination quite like a custom cake topper. Whether you are celebrating a royal-themed birthday, a whimsical wedding, or simply adding a touch of magic to a weekend bake, the Castle Cake Topper SVG has emerged as a favorite among hobbyists and professional crafters alike. This specific design is not just an image; it is a gateway to creating three-dimensional art that stands out on any dessert table. But for those new to the craft, the terminology and technical requirements can seem daunting. This guide aims to demystify the process, explaining exactly what an SVG is, why this 3D castle design is special, and how you can use it with popular machines like Silhouette Studio and Cricut Design Space.
Understanding the Foundation: What is an SVG?
Before diving into the castle design itself, it is essential to understand the file format. SVG stands for Scalable Vector Graphics. Unlike standard image files such as JPEGs or PNGs, which are made of pixels and can become blurry when enlarged, SVGs are made of mathematical paths. This means you can scale the image up to the size of a billboard or down to the size of a postage stamp without losing any quality. For crafters, this is crucial because it ensures clean, crisp cuts every time, regardless of the size of your project.
When we refer to a "3D SVG" in the context of paper crafting, we are not talking about a holographic image. Instead, we are referring to a layered design. The file contains multiple separate pieces that, when cut from cardstock and assembled, create depth and dimension. The Castle Cake Topper SVG is designed with this layering in mind, allowing you to build turrets, walls, and flags that pop off the page, giving your cake a professional, architectural look.
Why Choose a Castle Theme?
The castle motif is timeless. It evokes feelings of fairy tales, strength, and celebration. In modern event planning, themed desserts are a central focus. A flat, printed image of a castle might suffice for a casual gathering, but a 3D paper castle commands attention. It serves as a focal point, encouraging guests to take photos and engage with the presentation. Furthermore, using a digital file allows for complete customization. You can choose colors that match your party palette perfectly, something that is often impossible with pre-made plastic toppers found in stores.
The Significance of Compatibility
One of the most common questions beginners ask is, "Will this file work with my machine?" The Castle Cake Topper SVG is optimized for the two most popular cutting machines on the market: Silhouette Studio and Cricut Design Space. These software platforms are designed to read vector paths efficiently, ensuring that the intricate details of the castle windows, battlements, and layers are recognized and cut accurately.
However, the digital crafting world is diverse. If you are using a different type of machine, such as a Brother ScanNCut, a Siser Juliet, or a laser cutter, you must ensure your device supports SVG imports. While many modern machines do, older models or specific proprietary systems might require DXF or other formats. Always check your machine’s manual or software capabilities before purchasing. Attempting to use an incompatible file can lead to frustration, wasted materials, and poor cut quality.
Step-by-Step: From File to Finished Topper
Creating your castle topper is a rewarding process that blends technology with hands-on creativity. Here is a logical breakdown of how to approach this project, ensuring success even if you are a first-time user.
- Download and Unzip: After purchasing or downloading the Castle Cake Topper SVG, you will likely receive a ZIP file. Extract this folder to your computer to access the individual SVG files inside.
- Import into Software: Open your preferred design software. In Cricut Design Space, click "Upload" and select the SVG file. In Silhouette Studio, go to "File" and then "Merge." The design should appear on your canvas with all layers intact.
- Resize and Arrange: Determine the size of your cake. A standard 8-inch cake might need a topper that is 4–5 inches wide. Resize the entire group proportionally. Ensure that the layers are aligned correctly. Most 3D SVGs come with registration marks or guides to help you stack the layers evenly.
- Select Your Material: For a sturdy topper, use heavy cardstock (65lb to 110lb weight). Glitter cardstock or metallic finishes can add a magical shimmer to the castle walls. Avoid thin printer paper, as it will not hold the 3D structure well.
- Cut Settings: This is where precision matters. Select the correct material setting in your software. For intricate castle details, a "Cardstock" or "Heavy Cardstock" setting is usually appropriate. If your machine allows, use a fine-point blade for sharper corners.
- Weeding and Assembly: Once cut, carefully remove the excess material (weeding). Use tweezers for small window details. Then, begin stacking the layers. Use foam adhesive squares between layers to create the 3D effect, or liquid glue for a flatter profile. Attach a skewer or lollipop stick to the back for insertion into the cake.
Common Misunderstandings and Troubleshooting
Even with an easy-to-cut file, issues can arise. Understanding these common pitfalls can save you time and materials.
- "The lines are too close together." Intricate designs like castles have small details. If your machine is tearing the paper, your blade might be dull, or your cut pressure might be too high. Try reducing the pressure slightly or using a fresh blade.
- "The layers don't align." Sometimes, software updates can shift layer positions. Always double-check the alignment in your digital canvas before cutting. If necessary, use the "Attach" or "Weld" functions to keep pieces together during the cutting process.
- "It looks flat." The 3D effect relies on spacing. Do not glue the layers flush against each other. Use foam tape or multiple layers of glue to create visible gaps between the castle walls and the background, enhancing the shadow and depth.
Expanding Your Creative Horizons
Mastering the Castle Cake Topper SVG is just the beginning. The skills you learn here—importing vectors, managing layers, and understanding cut settings—are transferable to countless other projects. You can apply these techniques to create greeting cards, home decor signs, scrapbook elements, and even educational tools for children. The ability to manipulate digital files for physical creation is a valuable skill in today’s maker economy.
Moreover, this type of crafting fosters a deeper appreciation for design. You begin to notice how shapes fit together, how color contrasts affect visibility, and how structure influences stability. These are fundamental principles of engineering and art, learned through the joyful medium of paper crafting.
Final Thoughts
The Castle Cake Topper SVG is more than just a digital file; it is an invitation to create something memorable. By understanding the technical requirements and embracing the creative process, you can produce stunning, professional-quality decorations that elevate any celebration. Whether you are using a Silhouette, a Cricut, or another compatible machine, the key is to start simple, pay attention to detail, and enjoy the transformation of a digital path into a tangible work of art. Happy crafting!