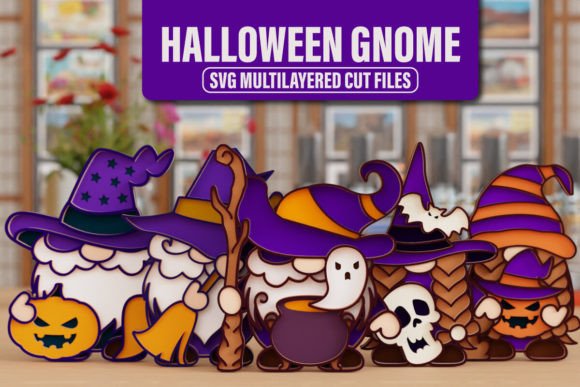
Halloween Gnome 3D SVG BUNDLE: A Practical Guide for Crafters and Sellers
The allure of layered paper crafts has taken the maker community by storm, and few designs capture the whimsical spirit of autumn quite like a Halloween Gnome 3D SVG BUNDLE. Whether you are a seasoned professional with a high-end laser cutter or a hobbyist just starting with a basic cutting machine, these digital files offer a gateway to creating stunning, dimensional art. However, diving into 3D papercraft without understanding the nuances of file preparation and layering can lead to frustration, wasted materials, and disappointing results. This guide aims to clarify what this bundle offers, highlight common pitfalls, and provide actionable advice to ensure your projects turn out beautifully.
Understanding the Digital Asset
Before you download or purchase, it is crucial to understand exactly what you are getting. This is not a physical item; no gnome will arrive at your doorstep. Instead, you receive a comprehensive digital package containing multiple file formats: Ai, EPS, SVG, PNG, PDF, DXF, and DWG. This versatility is intentional, designed to accommodate various software ecosystems and hardware capabilities. The core value lies in the precision of the vector lines, which allow cutting machines to slice through cardstock, wood, or acrylic with exactness.
Many beginners mistakenly believe that any SVG file will work seamlessly with their specific machine. In reality, compatibility issues often arise from how layers are organized within the file. A well-structured Halloween Gnome laser cutting file separates each depth level clearly, ensuring that when you upload it to your software, the cut paths are distinct and ordered correctly. If the layers are jumbled, you may find yourself spending hours manually sorting elements rather than crafting.
Ignoring Material Thickness and Tolerance
One of the most frequent errors creators make is assuming that the design will look the same regardless of the material used. A 3D gnome relies on stacking layers to create depth. If you use cardstock that is too thick, the layers may not align properly, causing the final piece to bulge or warp. Conversely, paper that is too thin may tear during the weeding process or fail to hold its shape when stacked.
Better Approach: Always test cut a small section of your chosen material first. Adjust your blade depth and pressure settings accordingly. For intricate details like the gnome’s beard or hat textures, consider using a slightly lighter weight paper for the upper layers to reduce bulk while maintaining structural integrity in the base layers.
Misunderstanding the Assembly Process
The instruction "stack the layers in the correct order as the serial" sounds simple, but it is where many projects fail. Users often rush through the cutting phase and then struggle to identify which piece goes where. Without a clear system, you might glue a middle layer upside down, ruining the symmetry of the gnome’s face or hat.
Better Approach: As you weed your cuts, keep the layers organized in separate envelopes or labeled bags. Use the provided PDF guide as a visual reference. Some crafters find it helpful to number the back of each layer with a pencil before assembly begins. This small step saves significant time and prevents the anxiety of trying to fit puzzle pieces together without a picture.
Overlooking Commercial Use Rights
For entrepreneurs and small business owners, understanding licensing is vital. This bundle explicitly states that you can sell the physical project. However, a common misconception is that this allows you to resell the digital files themselves. It does not. You are selling the tangible art piece—the framed wall decor or the greeting card—not the SVG data.
Better Approach: Clearly market your products as handmade, physical items. Keep your digital files secure and never share them with clients. This protects your investment and respects the intellectual property of the designer. By focusing on the quality of the finished product, you add value that digital downloads alone cannot provide.
Maximizing Versatility Across Projects
The true power of a Halloween Gnome 3D SVG BUNDLE lies in its adaptability. While wall art is the most obvious application, limiting yourself to this single use case means missing out on other profitable and creative opportunities.
- Greeting Cards: Scale down the design to create intricate pop-up cards. The layered effect adds a tactile element that recipients appreciate, making your messages stand out in a digital age.
- Scrapbooking: Use individual elements from the gnome design, such as the hat or pumpkins, as embellishments for autumn-themed memory books. The vector files allow you to isolate specific components easily.
- Home Decor: Beyond standard framing, consider mounting the cut layers on foam board for a shadow box effect. When backlit, the intricate cutouts cast mesmerizing shadows, transforming a simple paper craft into an elegant lighting feature.
Technical Checklist Before You Cut
To ensure a smooth workflow, follow this practical checklist before sending your file to the cutting machine:
- Verify File Format: Ensure you are using the correct file type for your software. Cricut users typically prefer SVG, while Silhouette users might opt for DXF or Studio files. Laser cutter users should check if their machine prefers AI or DXF for optimal path recognition.
- Check Layer Order: Open the file in your design software and confirm that the layers are stacked logically. The bottom layer should be at the back of the stack, and the top detail layer should be at the front.
- Inspect Anchor Points: Look for tiny, unconnected pieces that might fall out during cutting. If necessary, add small bridges or tabs to keep delicate parts attached to the main sheet until assembly.
- Prepare Your Workspace: Have your adhesive ready. Double-sided tape or spray adhesive works best for 3D layering as it dries flat and does not warp the paper like liquid glue might.
Final Thoughts on Quality and Satisfaction
Creating with a Halloween Gnome laser cutting file is a rewarding experience that blends technology with traditional craftsmanship. By avoiding common mistakes related to material selection, assembly organization, and licensing, you can produce high-quality items that delight customers and enhance your home. Remember, the goal is not just to cut paper, but to create dimension and story. Take your time, respect the process, and let the intricate details of the design shine through your careful execution. Whether you are making a gift for a loved one or stocking your online shop, attention to detail is what separates a good project from a great one.